By Raghav | |
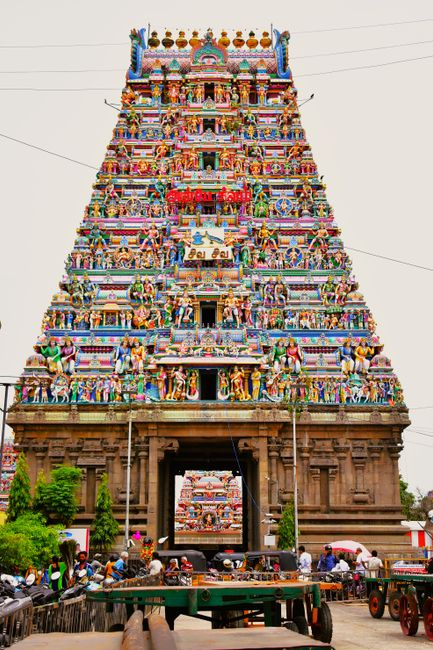
How I Photographed 10 Unique Temples in Chennai This July
In July 2026, I embarked on an ambitious project to photograph ten unique temples in Chennai over a single weekend. Armed with my trusty Nikon D850 and a 24-70mm f/2.8 lens, I set out to capture the intricate architecture, vibrant colors, and serene atmosphere that these sacred spaces offer. What I learned during this process was not only about the temples themselves but also about how to navigate the challenges of shooting in such dynamic environments.
Planning the Temple Tour
Choosing which temples to include was a challenge in itself. I wanted a diverse representation of Chennai’s rich spiritual fabric. After some deliberation, I settled on ten temples that showcased different styles, histories, and cultural significance. My itinerary included:
- Kapaleeshwarar Temple, Mylapore
- Parakala Mutt, Mylapore
- Sri Vadapalani Andavar Temple, Vadapalani
- Ashtalakshmi Temple, Besant Nagar
- Marundeeswarar Temple, Thiruvanmiyur
- Kotturpuram Siva Temple, Kotturpuram
- Vivekananda House, Kotturpuram
- Raja Rajeshwari Temple, Rajakilpakkam
- Iskcon Temple, Rajagopuram
- Arulmigu Sri Suryanarayana Swamy Temple, Kottivakkam
Each temple has its own story, and I wanted to ensure that I could convey that through my photography. My plan was to spend around an hour at each location, allowing ample time to explore different angles and lighting conditions.
Day 1: The Heart of Mylapore
On the first day, I began my journey at the renowned Kapaleeshwarar Temple in Mylapore. Arriving at 6 AM, I wanted to catch the golden hour. The temple’s gopuram was bathed in soft light, and the vibrant colors of the sculptures were breathtaking. I used a shutter speed of 1/250 sec, f/8, and ISO 200 to capture the details without overexposing the sky.
As I was framing my shots, I noticed a group of devotees engaged in a puja. I asked for their permission to photograph them, and they graciously agreed. This candid moment added a human element to my shots, which I later edited using Lightroom to enhance the warmth of the colors.
Exploring Mylapore’s Rich History
My next stop was the Parakala Mutt, just a short walk from Kapaleeshwarar. I was captivated by its serene ambiance. However, this was where I encountered my first hurdle. I forgot to check the temple’s visiting hours and arrived just as the doors were closing for the afternoon break. After a brief chat with the caretaker, I was allowed to shoot from the entrance. The lesson? Always verify timings before heading out, especially for temples that observe strict visiting hours.
Day 2: A Tour of Vibrant Temples
On the second day, I headed to the Sri Vadapalani Andavar Temple. This temple is known for its striking architecture and vibrant atmosphere. The temple was bustling with activity, which made for excellent candid shots of devotees engaged in rituals. I set my aperture to f/4 and bumped my ISO to 800 to capture the action in the dimly lit interiors.
One of my favorite moments came when I captured a child’s expression as she watched her mother light a lamp. It was pure joy and innocence, reminding me why I love documentary-style photography. I later used the crop tool in Adobe Photoshop to focus on her expression, which turned out to be one of my favorite photographs from the trip.
Afternoon Light at Ashtalakshmi Temple
Later that afternoon, I visited the Ashtalakshmi Temple in Besant Nagar. The temple is located right by the beach, and the evening light was fantastic. As I set up my shot with the waves crashing in the background, I experimented with long exposures to create a dreamy effect. I set my shutter speed to 1/15 sec and used a neutral density filter to keep the scene balanced.
However, I made another common mistake here. I forgot to stabilize my camera properly, resulting in some blurry shots. This was a lesson in being mindful of my setup, especially when working with longer exposures. I learned that investing in a good tripod can save you from disappointing results.
Capturing Quiet Moments
The next few temples I visited were quieter, allowing for introspective shots. At Marundeeswarar Temple in Thiruvanmiyur, I spent time observing the intricate carvings on the pillars. I felt the divine energy of the place and wanted to convey that stillness through my images. I set my camera to f/11 to achieve a greater depth of field, ensuring that the details in my composition were crisp.
Finding Hidden Gems
One of the hidden gems was the Kotturpuram Siva Temple. Tucked away in a residential area, this temple had an intimate vibe. I spoke to a local priest who shared stories about the temple’s history. This interaction not only enriched my understanding but also allowed me to capture authentic moments of devotion. I used a 50mm lens here for its ability to create beautiful bokeh, isolating subjects against the textured backdrop of the temple.
Mistakes I Made
With each temple I visited, I learned valuable lessons, primarily through my mistakes. Here are a few that stood out:
1. Check Permissions and Timing
As mentioned earlier, arriving at Parakala Mutt when it was closed was a setback. Always check the temple’s timings and any photography restrictions. Some temples may require prior permission for photography, especially during festivals.
2. Stabilization Matters
Not using a tripod for long exposures resulted in some missed opportunities. Invest in a sturdy tripod, especially for low-light situations. It can make a significant difference in your image quality.
3. Be Mindful of Surroundings
At the Ashtalakshmi Temple, I was so focused on the waves that I didn’t notice the crowd moving in my frame. This taught me to be aware of my surroundings at all times and to plan my shots accordingly.
Final Thoughts
After a weekend filled with exploration, I realized that photographing these temples was not just about capturing images; it was about understanding the essence of Chennai’s spiritual heritage. Each temple has its own story, and as a photographer, it’s my job to tell that story through my lens. If you’re planning a similar project, I encourage you to take your time at each location. Allow yourself to connect with the space and its people. Carry a few extra batteries and memory cards, as you never know when inspiration will strike!
Location Tips
Here are some insider tips for photographing temples in Chennai:
Kapaleeshwarar Temple, Mylapore
Arrive early to avoid crowds. The best light is during the golden hour, so plan to be there around 6 AM. Parking can be tricky, so consider using public transport or ride-sharing services if possible.
Sri Vadapalani Andavar Temple, Vadapalani
This temple is very popular, especially during festival seasons. On weekends, arrive as early as possible. Note that photography may be restricted during pujas, so check ahead.
Ashtalakshmi Temple, Besant Nagar
This temple offers a stunning seaside backdrop. Visit during weekdays for a quieter experience. There’s ample parking nearby, but it can fill up quickly on weekends.
What are the best times to photograph temples in Chennai?
The best times are early morning and late afternoon when the light is softer, making for beautiful images. Avoid mid-day when the sun is harsh.
Do I need permission to photograph inside temples?
Some temples do require prior permission, especially during religious ceremonies. It’s always best to ask the temple authorities before shooting.
What gear should I bring for temple photography?
A DSLR or mirrorless camera, a versatile zoom lens (like a 24-70mm), extra batteries, and memory cards are essential. A tripod is also helpful for low-light conditions.
Can I take candid shots of devotees?
Yes, but always ask for permission first. Many people appreciate being photographed, but respect their privacy if they decline.
Explore more photography tips, stories & inspiration