By Raghav | |
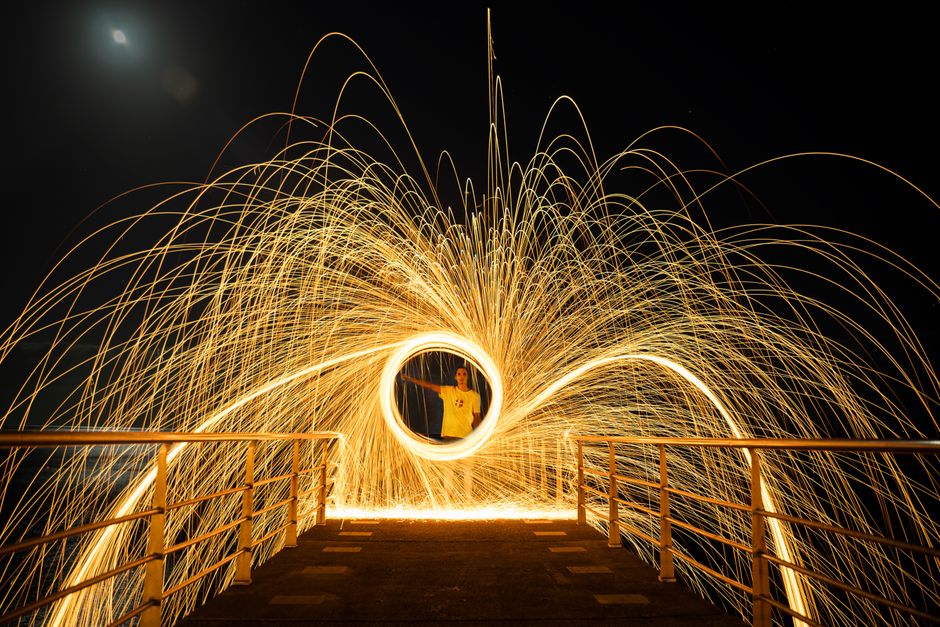
How I Used Light Painting in My August Chennai Shoot
On the evening of August 5, 2026, I found myself at the serene shores of Elliot’s Beach, armed with my trusty Nikon D850 and a few LED light sources. It was a humid night, the kind that Chennai is known for, but I was determined to experiment with light painting during my session with a couple, Priya and Vinay, who were celebrating their engagement. Little did I know that this shoot would not only challenge my technical skills but also teach me invaluable lessons about the magic of light in photography.
The Setup: Choosing the Right Location
Choosing the right location is crucial for any shoot, but even more so for light painting, as you need space and a relatively dark environment to let the creativity unfold. I arrived at Elliot’s Beach around 6 PM to scout the area and plan my shots. The beach is lined with palm trees and has a beautiful promenade, making it perfect for both portrait and creative photography.
One of my favorite spots is near the entrance, where the beach opens up into a wide expanse, allowing for ample space to work. I checked the tide conditions as well — low tide is preferable since it gives you more room to maneuver without getting wet. Also, parking can be a hassle, so I recommend arriving early to secure a good spot near the entrance.
Lighting Gear and Setup
For this session, I brought along my Nikon D850, a Manfrotto tripod, and two LED light sticks. I also had a remote shutter release to minimize camera shake during long exposures. The plan was to use the light sticks to create interesting patterns and shapes around Priya and Vinay while capturing them in the frame.
Engagement with the Couple
Prior to the shoot, I had met Priya and Vinay at a local café in Mylapore. They were excited but also nervous about being in front of the camera. I reassured them that this would be a fun experience, emphasizing the creative aspect of light painting. As we began the shoot, I encouraged them to interact with each other, making the moment genuine and relaxed.
Executing the Light Painting
As the sun dipped below the horizon, I set my camera to a 15-second exposure with an aperture of f/8 and ISO 100. The first few attempts were met with mixed results. I had them pose in various positions, while I moved around them with the LED sticks, trying to create different shapes. Initially, the results were too bright or too faint, and I found that my timing was off.
One memorable moment came when I attempted to create a heart shape around them. I got too excited, and my movements were not as fluid as they should be. The heart ended up looking more like an abstract blob. This taught me that practice and timing are essential when it comes to light painting. I took a moment to regroup, recheck my settings, and slow down my movements. Timing is everything.
Post-Processing: Bringing the Vision to Life
After the shoot, I was eager to see how the images turned out. I imported the RAW files into Adobe Lightroom. One photo in particular stood out, where I had managed to create a flowing light trail around Priya and Vinay. The original file had a slight blue tint due to the ambient street lights, which I adjusted using the temperature slider. I also increased the exposure just a notch and applied some noise reduction, as the high ISO had introduced a bit of graininess.
The final result was stunning, and both Priya and Vinay were thrilled when I delivered the edited images a week later. Seeing their joy made the entire experience worthwhile.
Mistakes I Made
Reflecting on the shoot, I realized that there were several mistakes I made that day. One pivotal error was not communicating clearly with the couple about what to expect during light painting. Initially, they were stiff and posed, not understanding how interactive the process could be. I learned that setting the right expectations is vital to ease any anxiety they might feel in front of the camera.
Another mistake was not having backup batteries for my LED lights. Halfway through, one of the sticks started to flicker and eventually died. Thankfully, I had enough time to adapt and used the remaining stick creatively, but it taught me the importance of being prepared for the unexpected.
Specific Location Tips for Chennai Photography
When planning a shoot in Chennai, especially for creative photography like light painting, here are some locations I highly recommend:
1. Marina Beach
Marina Beach is iconic, but it can get crowded. I suggest visiting during sunrise or sunset for the best light. The best parking option is near the lighthouse, where you can find ample space, but be prepared for a short walk to your desired spot.
2. Theosophical Society
The Theosophical Society in Adyar is a hidden gem. It offers lush greenery and beautiful architecture, perfect for portrait sessions. The main gate has limited parking, so arrive early to secure a spot. Ensure you check for any permissions required for photography in the garden area.
Gear Breakdown: Must-Have Equipment for Light Painting
For anyone looking to dive into light painting, here’s a quick gear breakdown:
- Camera: I recommend the Nikon D850 for its excellent low-light capabilities.
- Tripod: A stable tripod is non-negotiable. The Manfrotto is a solid choice.
- Light Sources: LED light sticks or flashlights work well; opt for ones that have adjustable brightness.
- Remote Shutter Release: This is crucial for long exposure shots to prevent camera shake.
- Editing Software: Adobe Lightroom is my go-to for post-processing.
In my experience across 200+ shoots, the right gear can make a significant difference in the quality of your work. Invest wisely.
Final Thoughts
Light painting is not only a fun technique but also a fantastic way to express creativity in photography. Each shoot, like the one with Priya and Vinay, allows you to push your boundaries and explore new artistic avenues. Don’t shy away from experimenting; the best photos often come from moments of spontaneity and joy. Chennai has countless locations waiting to be captured, and with a bit of ingenuity, you can turn ordinary scenes into extraordinary memories.
What is light painting in photography?
Light painting is a photographic technique that involves using a moving light source during a long exposure to create artistic effects in the image. It can add creativity and a unique touch to your photos.
What camera settings should I use for light painting?
For light painting, I recommend using a slow shutter speed (around 10-30 seconds), a low ISO (100), and a moderate aperture (f/8 to f/16) to achieve the best results while maintaining clarity and detail.
Where are the best locations for light painting in Chennai?
Some great locations for light painting in Chennai include Elliot’s Beach for its expansive space and Marina Beach for its stunning backdrop. The Theosophical Society is also a fantastic spot for creative photography.
What mistakes should I avoid when trying light painting?
Avoid rushing the process and not communicating your vision to your subjects. Additionally, always check your gear beforehand, including batteries for your light sources, to avoid interruptions during the shoot.
I’m Raghav, a professional photographer based in Chennai with over 8 years of experience specializing in wedding, portrait, and travel photography. I’ve had the privilege of capturing countless memories across Tamil Nadu, and I’m always looking for new ways to tell stories through my lens.

Explore more photography tips, stories & inspiration